Spring Security
1、快速入门
创建springboot工程
添加依赖
1
2
3
4
5
6
7
8
9
10
11
12
13
14
15<dependency>
<groupId>org.springframework.boot</groupId>
<artifactId>spring-boot-starter-web</artifactId>
</dependency>
<dependency>
<groupId>org.projectlombok</groupId>
<artifactId>lombok</artifactId>
<optional>true</optional>
</dependency>
<dependency>
<groupId>org.springframework.boot</groupId>
<artifactId>spring-boot-starter-security</artifactId>
</dependency>启动项目进行访问
使用控制台输出的密码进行登录
2、认证
1. 登录校验流程

2.原理
1. SpringSecurity完整流程图
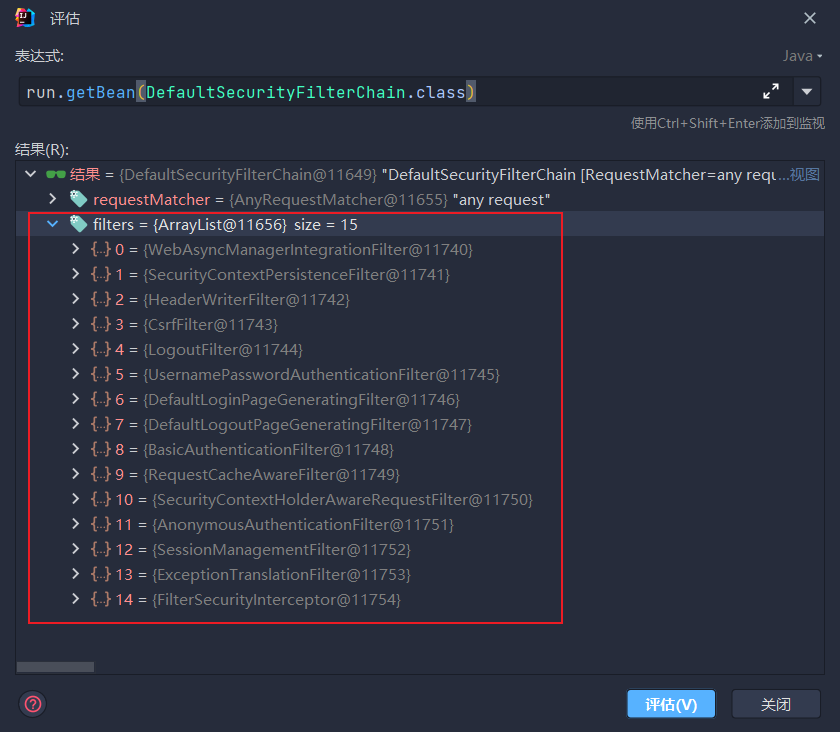
SpringSecurity的原理其实就是一个过滤器链,内部包含了提供各种功能的过滤器。
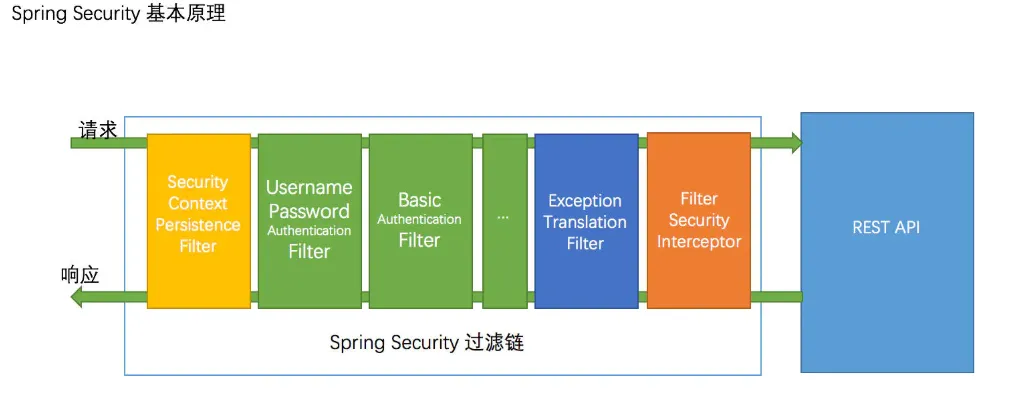
UsernamePasswordAuthenticationFilter:负责处理我们在登陆页面填写了用户名密码后的登陆请求。入门案例的认证工作主要有它负责。
ExceptionTranslationFilter:处理过滤器链中抛出的任何AccessDeniedException和AuthenticationException。
FilterSecuritylnterceptor:负责权限校验的过滤器。
2.详细认证流程

Authentication接口:它的实现类,表示当前访问系统的用户,封装了用户相关信息。
AuthenticationManager接口:定义了认证Authentication的方法
UserDetailsService接口:加载用户特定数据的核心接口。里面定义了一个根据用户名查询用户信息的方法。
UserDetails接口:提供核心用户信息。通过UserDetailsService根据用户名获取处理的用户信息要封装成UserDetails对象返回。然后将这些信息封装到Authentication对象中。
登录验证时序图
3. 使用
1. 分析
- 登录
- 自定义登录接口
调用ProviderManage的方法进行认证 如果认证通过生成jwt
把用户信息存入redis中 - 自定义userDetailService
在这个实例中去查询数据库
- 自定义登录接口
- 校验
- 定义jwt认证过滤器
获取token
解析token获取其中的userid
从Redis中获取用户信息
存入SecurityContextHolder
- 定义jwt认证过滤器
- 添加依赖
- maven
1
2
3
4
5
6
7
8
9
10
11
12
13
14
15
16<dependency>
<groupId>org.springframework.boot</groupId>
<artifactId>spring-boot-starter-data-redis</artifactId>
</dependency>
<dependency>
<groupId>com.alibaba</groupId>
<artifactId>fastjson</artifactId>
<version>1.2.40</version>
</dependency>
<dependency>
<groupId>io.jsonwebtoken</groupId>
<artifactId>jjwt-api</artifactId>
<version>0.11.5</version>
</dependency> - 添加redis相关配置 响应类
1
2
3
4
5
6
7
8
9
10
11
12
13
14
15
16
17
18
19
20
21
22
23
24
25
26
27
28
29
import com.alibaba.fastjson.support.spring.FastJsonRedisSerializer;
import org.springframework.context.annotation.Bean;
import org.springframework.context.annotation.Configuration;
import org.springframework.data.redis.connection.RedisConnectionFactory;
import org.springframework.data.redis.core.RedisTemplate;
import org.springframework.data.redis.serializer.StringRedisSerializer;
public class RedisConfig {
public RedisTemplate<Object, Object> redisTemplate(RedisConnectionFactory connectionFactory) {
RedisTemplate<Object,Object> template = new RedisTemplate<>();
template.setConnectionFactory(connectionFactory);
FastJsonRedisSerializer serializer = new FastJsonRedisSerializer(Object.class);
// 使用StringRedisSerializer来序列化和反序列化redis的key值
template.setKeySerializer(new StringRedisSerializer());
template.setValueSerializer(serializer);
// Hash的key也采用StingRedisSerializer的序列化方式
template.setHashKeySerializer(new StringRedisSerializer());
template.setHashValueSerializer(serializer);
template.afterPropertiesSet();
return template;
}
}工具类1
2
3
4
5
6
7
8
9
10
11
12
13
14
15
16
17
18
19
20
21
22
23
24
25
26
27
28
29
30
31
32
33
34
35import com.fasterxml.jackson.annotation.JsonInclude;
import lombok.Data;
/**
* @author YuYawei
* @Description: 响应类
* @create 2022-08-11 16:55
*/
public class ResponseResult <T>{
/**响应码*/
private Integer code;
/**提示信息*/
private String msg;
/**返回的结果*/
private T data;
public ResponseResult(Integer code,String msg){
this.code = code;
this.msg = msg;
}
public ResponseResult(Integer code, T data){
this.code = code;
this.data = data;
}
public ResponseResult(Integer code, String msg, T data){
this.code = code;
this.data = data;
this.msg = msg;
}
}1
- maven
本博客所有文章除特别声明外,均采用 CC BY-NC-SA 4.0 许可协议。转载请注明来自 一只小可乐!